Smartphones today pack a remarkable amount of technology into extremely compact bodies. According to research from Statista, more than 1.4 billion smartphones are shipped globally each year, which means millions of devices eventually need repair or component replacement.
Screen damage remains the most common problem. Cracks, display glitches, or touch failures push many people toward repair.
Opening a smartphone may look simple in online videos. In reality, modern devices are tightly sealed with adhesive, delicate connectors, and fragile glass layers. A careless attempt can easily damage internal components.
Below you will find the tools, techniques, and safety practices that professionals rely on when removing smartphone screens.
Why Safe Smartphone Opening Matters
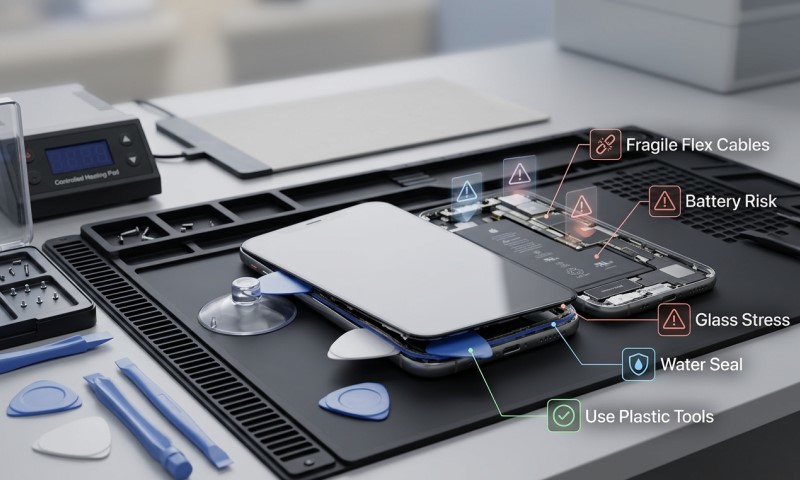
Opening a smartphone is not just about prying off the display. Modern devices use strong adhesive seals, thin display cables, and tightly arranged components. Improper techniques can lead to permanent damage.
People usually attempt repairs when facing cracked glass or display failures. In those situations, phone screen parts must be handled carefully during installation.
Reliable components and repair tools can make the process far smoother, which is why many technicians source compatible parts through suppliers that specialize in phone screen replacement components designed for specific device models.
Several risks appear when phones are opened incorrectly.
- Display cables can tear during removal
- Internal battery cells may be punctured by metal tools
- Water resistant seals can be damaged permanently
- Small screws and brackets may be misplaced
Safe opening techniques prevent these problems and increase the chance that the repair will succeed on the first attempt.
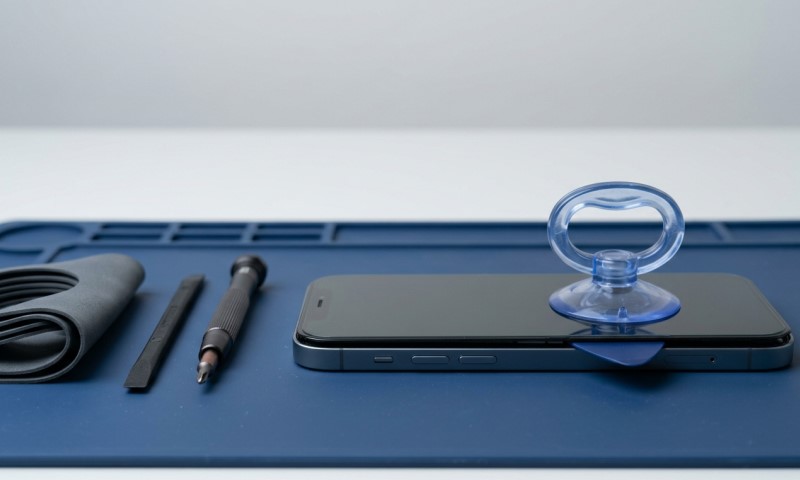
Essential Tools Needed For Smartphone Screen Removal
Before attempting to open any smartphone, proper tools must be prepared. Using improvised objects such as kitchen knives or metal screwdrivers greatly increases the chance of damaging the device.
Technicians rely on specialized repair kits that include several small tools designed for electronics.
Basic tools used in smartphone repairs
- Precision screwdrivers with interchangeable bits. Most smartphones require very small screws such as Phillips, Torx, or Pentalobe types.
- Plastic opening picks. These thin flexible tools help separate adhesive without scratching internal parts.
- Suction cups designed for electronics. These create gentle lifting pressure when separating the screen.
- Tweezers for handling screws and connectors.
- Heat source such as a heat pad or controlled heat gun that softens adhesive around the display.
| Tool | Purpose | Risk if Missing |
| Precision screwdriver | Removes tiny internal screws | Stripped screws |
| Plastic pick | Separates screen adhesive | Broken glass edges |
| Suction cup | Lifts screen evenly | Screen cracks during lifting |
| Tweezers | Handles connectors | Lost components |
| Heat source | Softens adhesive | Screen frame damage |
Preparing The Smartphone Before Opening
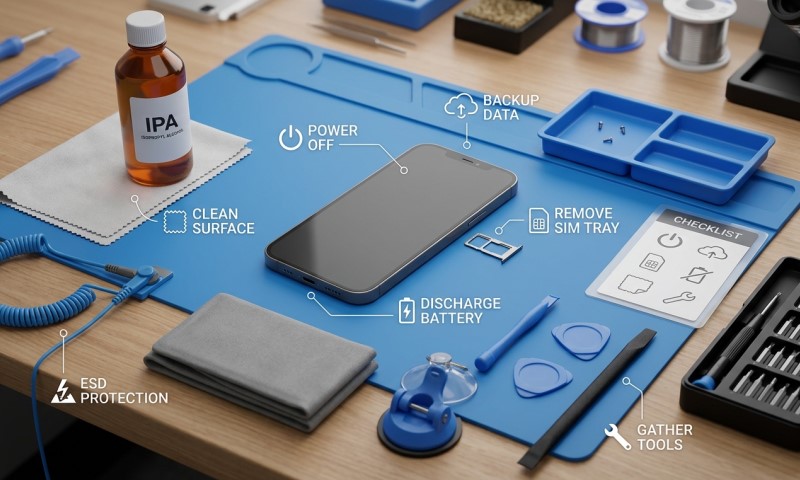
Preparation plays a critical role in safe smartphone screen removal. Skipping this stage often leads to accidental damage or lost components.
Before touching any internal part, the phone should be powered off completely. This prevents short circuits when internal connectors are exposed.
Safe preparation steps
- Turn the phone off completely
- Remove the SIM tray if present
- Clean the device exterior to remove dust or debris
- Work on a flat, well lit surface
- Use a magnetic repair mat to organize screws
A well organized workspace helps prevent mistakes during reassembly.
Many smartphones contain screws of slightly different lengths. Placing a long screw in the wrong hole during reassembly can damage internal layers of the motherboard.
Technicians often photograph each stage during disassembly. This visual reference helps ensure that every component returns to its correct location during reassembly.
Taking five minutes to prepare properly can prevent hours of troubleshooting later.
How Adhesive Seals Affect Screen Removal
Modern smartphones rely heavily on adhesive instead of mechanical clips. This adhesive provides structural support and contributes to water resistance.
Because of this, screens rarely separate easily without heat.
Why heat is required
Adhesive used in smartphones becomes softer when gently heated. Controlled warming allows tools to slide between the display and frame without cracking the glass.
Most technicians warm the device between 60°C and 80°C using specialized heating mats. Household hair dryers can also work if used carefully.
Did you know?
Many flagship smartphones use industrial grade pressure sensitive adhesive similar to the material used in automotive manufacturing. That strength explains why displays feel firmly bonded to the device frame.
Heating the device evenly around the edges reduces stress points that could cause the glass to shatter during removal.
Patience during this stage greatly improves success rates.
Step By Step Technique For Removing A Smartphone Screen
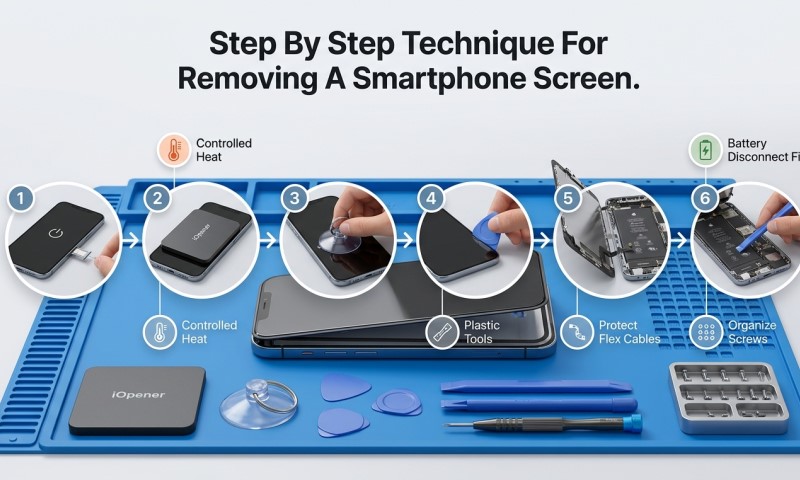
Screen removal should always follow a controlled process rather than random prying.
Step 1: Loosen the adhesive
Warm the phone edges gradually using a heating pad or controlled heat gun. Focus on the display border where adhesive is strongest.
Step 2: Apply the suction cup
Attach the suction cup near the lower portion of the screen and pull gently upward. The goal is to create a tiny opening between the frame and the display.
Step 3: Insert a plastic pick
Once a small gap appears, slide a plastic pick into the seam. Move slowly along the edges to separate adhesive.
- Work gradually around the device perimeter
- Reapply heat if resistance increases
- Avoid pushing the tool too deeply
Step 4: Lift the display carefully
Many screens remain connected with ribbon cables. The display should be lifted slowly like opening a book rather than removed immediately.
Step 5: Disconnect internal cables
Inside the device, small metal shields protect the display connectors. Remove the screws holding these covers before disconnecting the cables.
Careful, steady movements reduce the chance of accidental cable damage.
Safety Tips Professionals Always Follow
Professional repair technicians rely on consistent safety habits that protect both the device and the person performing the repair.
These habits may seem small, yet they greatly reduce the chance of mistakes.
Essential repair safety habits
- Always disconnect the battery before replacing internal components
- Use anti static wrist straps when possible
- Keep screws organized according to their original position
- Avoid working on carpeted surfaces that generate static electricity
- Wear protective eyewear when dealing with cracked glass
Interesting fact
Lithium batteries inside smartphones can ignite if punctured. Although rare, technicians treat battery areas carefully and avoid inserting tools near the battery compartment.
Slow and controlled movements remain the best approach for any repair task.
Reassembling The Phone After Screen Replacement
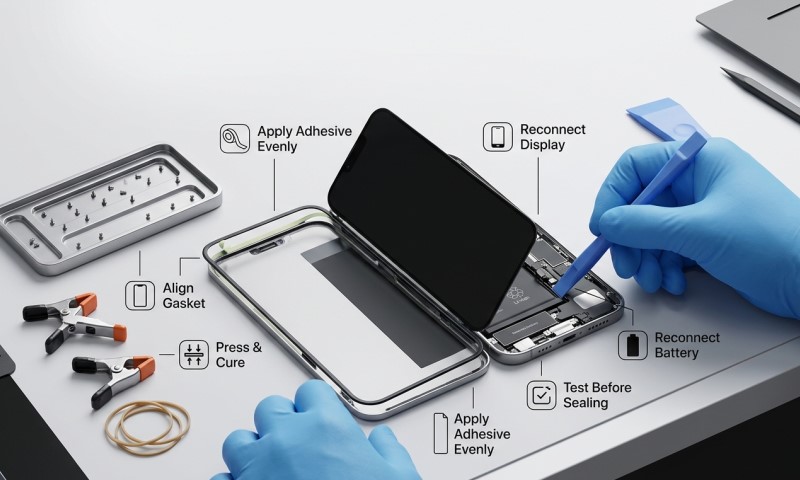
Reassembly is often easier than disassembly, yet it still requires careful attention.
Every internal connector must be reattached firmly and the screws returned to their original locations.
Reassembly checklist
- Reconnect display and digitizer cables
- Replace protective connector shields
- Reconnect the battery last
- Clean old adhesive from the frame
- Apply fresh adhesive before sealing the screen
After installation, the screen should be pressed evenly along the edges to ensure proper bonding.
Allowing the adhesive to set for several minutes before powering the device helps maintain proper alignment.
Final Thoughts
Smartphone screen removal may appear intimidating at first glance. Modern devices are compact, tightly sealed, and packed with fragile components. Still, with the correct tools and a patient method, opening a smartphone safely becomes a manageable process.
Preparation, controlled heating, and careful use of plastic tools form the foundation of safe screen removal. Avoiding force and keeping the workspace organized greatly increases the chances of success.
Many repairs fail not because of complexity but because of rushing the process. Taking time to warm adhesive, lifting the screen slowly, and protecting delicate connectors keeps the device safe during repair.
For people interested in learning basic smartphone repair skills, screen removal offers a useful starting point. With practice and attention to detail, even delicate repairs become easier and more predictable.